Category: teaching

Everybody gets a whiteboard!

One of the key findings about How People Learn is that teachers need to draw out and work with students’ existing knowledge and skills. Ken Bain, in What the Best College Teachers Do, emphasizes students need to encounter a safe environment to try, fail, get feedback, and try again before facing a summative evaluation. The challenge for instructors is to find ways to draw out knowledge from EVERY student and create opportunities for EVERY student to practice.

Small, portable whiteboards (aka dry erase boards if you’re searching your institution’s suppliers’ catalogs) can achieve both of these.

Let me save the kinds of whiteboard-related tasks you can give to students for a future post. Here, I want to describe the class sets of whiteboards we put together. Each set contains 12 whiteboards which, when used for collaborative activities in groups of 3-4 students, can handle classes of 40-50 students. The key components are

  1. light-weight whiteboards that are small enough to carry and manipulate in class but large enough to let multiple students collaborate
  2. getting dry erase markers into EVERY student’s hand
  3. a convenient way for the instructor to get the kit to class and then carry it away afterwards

1. Portable whiteboards

Size and weight are the biggest concerns. Oh, and cost. You can cut way down on weight by foregoing magnetic whiteboards. We found these 18″ x 24″ light-weight whiteboards by Universal available through CDW. They’re only $15.99 retail (and even cheaper through our institutions purchasing system). These boards are so light, it’s very easy for students to pass them around, rest them on their knees, and hold them up for others to see. The only drawback to these particular boards is an inch-wide pen “tray” along the bottom of the board — the boards are made to be mounted on the wall — but it makes a good handle for students to grab.

2. Dry erase markers.

To create opportunities for EVERY student, it’s important to have enough dry erase markers that EVERY student gets one. Otherwise, he who holds the marker, holds the final say. I also like to give each student a different colored pen so they (and I) can easily see their contributions. We went with EXPO fine tip dry erase markers that come in boxes of 12 for $23.92 at Grainger. Four boxes – black, blue, red, green – gave us four markers for each board. We also included an eraser in each kit ($3.99 each by Universal from CDW) and a container of EXPO cleaning wipes ($14.99 at Grainger) we use to give the boards a once-over every now and then.

You can’t waste a lot of time handing out pens and erasers, collecting them again at the end of class so we put each set of 4 markers and an eraser into a pencil case, one per board. This works beautifully – quick to distribute, quick to collect, quick to reset for the next class. We found these canvas + mesh (mesh was great because you see what was in the kit without having to open the zipper) at our university bookstore for $2.29 each.

Each whiteboard comes with a pencil case containing 4 different-colored markers and an eraser. (Picture: Peter Newbury)

3. Carrying case

University instructors very rarely have a classroom where they can leave things. Instead, you arrive at the classroom 5-10 minutes before your class starts, bringing everything you need – computer, video adapter thingy, notes, water bottle, hand-outs, WHITEBOARDS – and then carry it all away after class. So, portability of these whiteboards is a critical.

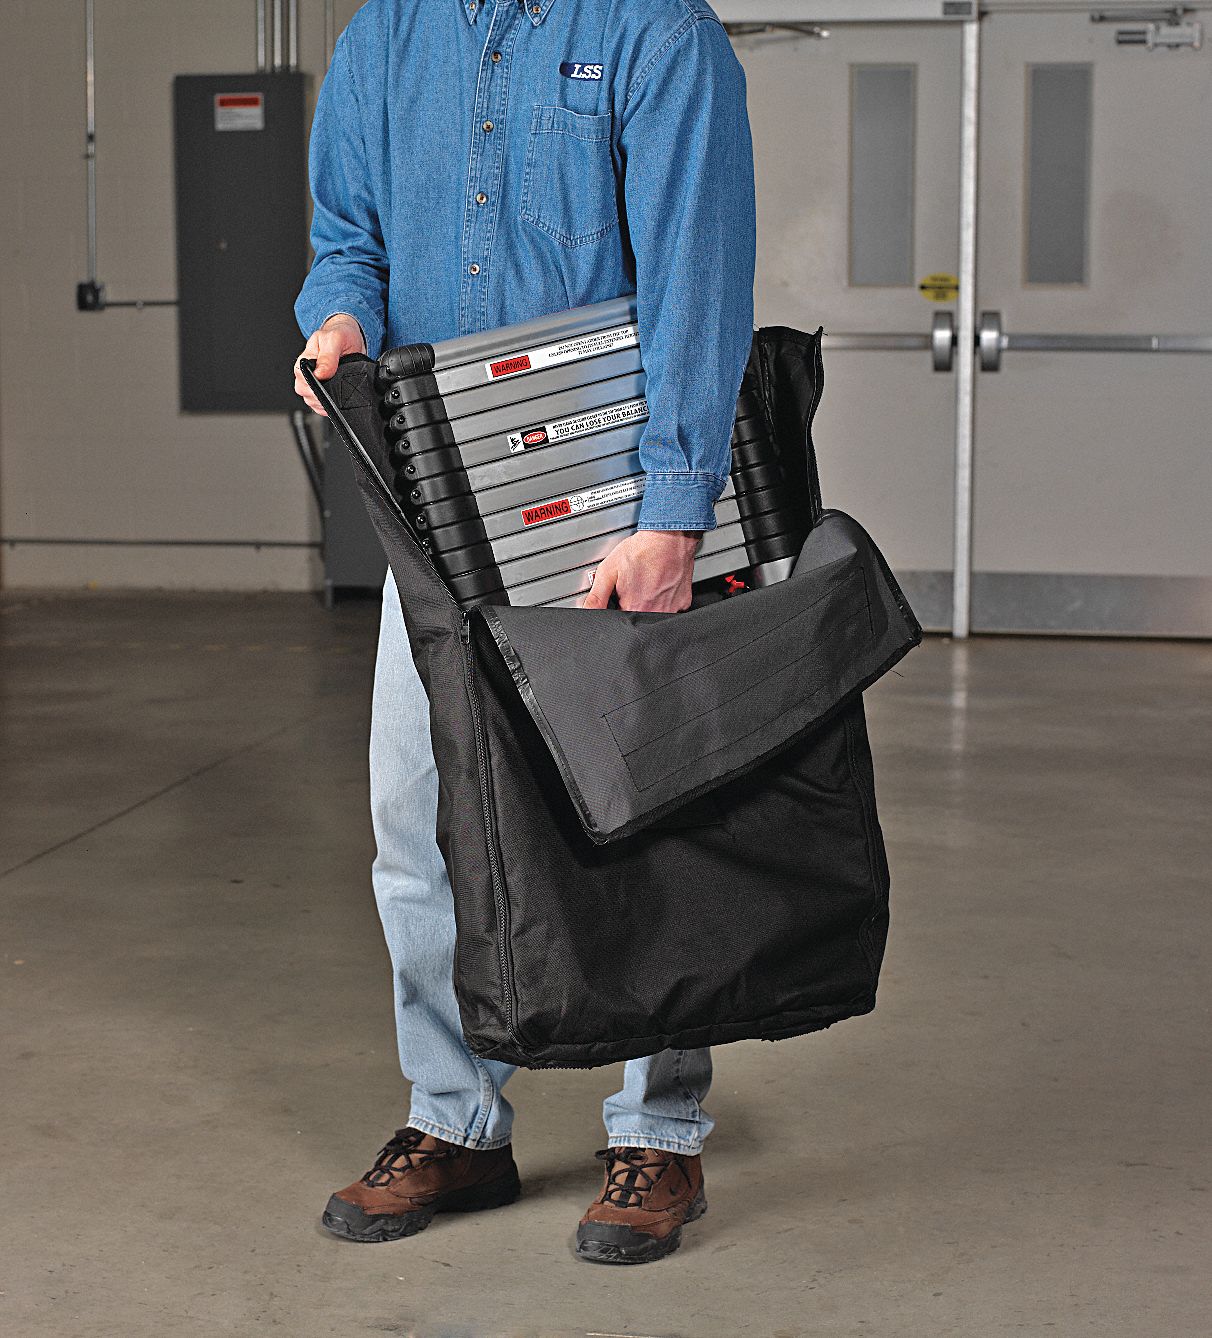
We totally lucked out searching our universities suppliers’ website for “carrying case” when we stumbled onto this carrying case made for a retractable TeleSteps ladder ($74.90 from Grainger.) The bag easily holds twelve 18″ x 24″ whiteboards, with enough room to toss in the pencil cases. I’m not saying the strap doesn’t dig into your shoulder after walking halfway across campus but the case keeps everything in one place and you can dump on the ground when you get to class and deal it once you’ve got everything else ready. Heck, ask one of those enthusiastic students in the front row to distribute the boards and pencil cases for you.

Total cost per set of 12 whiteboards

Item Ea. Total
12 18″ x 24″ whiteboards $15.99 $191.88
dry erase markers (black, 12 pack) $23.92 $23.92
dry erase markers (blue, 12 pack) $23.92 $23.92
dry erase markers (red, 12 pack) $23.92 $23.92
dry erase markers (green, 12 pack) $23.92 $23.92
12 dry whiteboard erasers $3.99 $47.88
12 pencil cases $2.29 $27.48
1 container cleaning wipes $14.99 $14.99
1 TeleSteps carrying case $74.90 $74.90
Total $452.81

There’s taxes and delivery. And prices will vary if you buy these directly from the supplier or through your university’s purchasing website. You’ll have to keep buying more markers and cleaning wipes but everything else is a one-time purchase.

Overall, that’s a lot of learning for $500 🙂

Working with a diverse group? Try a card sort.

Education technology? Yep.

I went to a day-long retreat where the participants, about 20 of us, were deliberately selected to represent a wide range of backgrounds, experiences, and expertise – all the stakeholders in big project. The retreat organizer suggested each person prepare a 5-10 minute presentation about what they’ll bring to the project and what they’re hoping to get out of it. I was there to represent the teaching and learning support my center provides to instructors.

I had nightmar—, uh, visions of participant after participant clicking through PPT after PPT. The educator in me didn’t want that to happen so I decided to do something active to give my colleagues a better understanding of what I do. They would experience it rather than listen to me describe it. You know, active learning.

(For the record, PPT after PPT was NOT what happened. People talked and distributed some hand-outs. Better that I was prepared, though.)

That’s when I remembered a really interesting and engaging activity I did during a workshop from Kimberly Tanner: card sorting. The idea is, you give each group of 2-4 participants a short stack of cards. Not playing cards but, for example, 9 index cards, one item on each card. In Kimberly’s workshop, the cards were 9 different superheroes. You ask the groups to sort the cards into categories — any categories they want — with just a couple of rules: there has to be at least 2 categories; there can’t be 9 categories (ie, you can’t put each card in its own category.) Well, there are more rules but that’s all I needed for my version.

Then something interesting happens. You’ve carefully chosen the cards so that the items have both surface features (these are superheroes with primarily green costumes, these are mostly blue, these mostly red) and deep features (these are Marvel superheroes, these are DC.) How people sort the cards reveals their level of familiarity and expertise with the content, and gives each participant ample opportunity to share that knowledge with their group-mates.

Back to my card sorting task: I made 9 cards, each one giving the name of a course, the course description, and the format of the course meetings (lectures, labs, discussions, seminars, online, etc.) Thanks, btw, to my colleague Dominique Turnbow for the great advice about what to put on the cards.

So, 9 courses. Please sort them into more than 2 but less than 9 categories:

Participants sorted these 9 cards into categories. Each card describes a different course. (Photo: Peter Newbury CC-BY)

There were lots of surface features that could be used:

  • STEM vs Social/Behavioral/Economic Sciences vs Arts & Humanities
  • those with discussion sections vs those with labs
  • which UC San Diego Division they fit in: Biological Sciences, Physical Sciences, Engineering, Social Sciences, Arts & Humanities, Medicine, etc.
  • (I forgot to put class size on the cards – d’oh! – but that would be another way to sort them: small, medium, large, ridiculous enrolment)

I was expecting some of those “surface” sorts but my colleagues blew through those surface features and quickly re-sorted based on deeper features. Honestly, the categories they invented and the categories I made up ahead of time (in case they needed an example) are mixed up in my memory but here are some deeper features (analogous to “color of superhero costume” and “superhero publisher”)

  • technology enhanced
  • amount of active learning in typical classes
  • computationally-focused
  • amount of  close reading required
  • use statistics
  • amount of writing required

Well?

We took 5-10 minutes to sort and then another 10 minutes to report out. Sure, I went over my 10-minute slot but the schedule was very flexible (by design).

I think the activity went great. It gave participants, many of whom were strangers to each other, an opportunity to share their backgrounds and expertise with each other. It revealed the breadth of knowledge in the room. And it gave everyone involved a reminder to look past the surface features of our meeting and project – who will be responsible for this or that, how many offices will be required, what budget will this come from – and look at the big picture: supporting learning.

Details about implementation

(These details are mostly for me so I’ll remember what to do next time. If you’re thinking about running a card-sorting activity, you might find them helpful, too.)

  • I started with a spreadsheet to help me select sufficient courses that covered the surface and deeper features I wanted. I printed it out and had it with me during the activity so I could remember why I’d included the courses and what I anticipated as surface / deeper features.
  • I wrote the course descriptions in Word as 2″ x 4″ labels, printed the labels, and stuck them to index cards. This made it easy to create as many stacks as I needed:
I made 8 sets of cards. What do you notice about the stacks? (Photo: Peter Newbury CC-BY)
  •  What do you notice about the stacks? Right, the missing corners. Each stack has a different missing corner so I can easily reset the cards into stacks. Can you imagine the tedious task of sorting 8 x 9 = 72 virtually identical cards into stacks? No, thank-you!
  • There were 2 main camps of people at the retreat, plus a number of important “third parties.” As I began the activity, I formed groups of 2-3 with at least one person from each camp.
  • I used some old fridge magnets to make 9 magnets, one for each course. When the groups reported out, I quickly arranged the magnets on a handy whiteboard so I could hold it up for the others in the room to see:
When the groups reported out, I quickly arranged the magnets on a handy whiteboard so I could hold it up for the others in the room to see. (Photo: Peter Newbury CC-BY)

Hello, my name is Prof–, no Doc–, no, ugh.

I have the pleasure of teaching a course at UC San Diego called “The College Classroom.” It’s a course for graduate students and postdocs about teaching and learning in higher education. Sometimes it’s theoretical, like when we talk about constructivism or mindset, sometimes it’s practical, like when we talk about various evidence-based instructional strategies, and sometimes it’s extremely practical, like what to do and say on the first day of class of the course you’re teaching.

(Image by Peter Newbury)
(Illustration by Peter Newbury)

On that first day of class, when you’ve finally created sufficient materials, found the classroom, figured out how to connect the &%@# adapter to your laptop to display your slides, and at last, flip on the microphone — yeah, at that moment, you’re not at your best. You’re nervous and exhausted and excited and… And that’s not the moment when you want to be making important decisions that will impact the rest of the course.

So, I prompt my students to think NOW about those decisions, especially:

I prompt students to think NOW about what they want their students to call them.

I use clickers to gather their choices, not because there’s a right answer but because it encourages everyone to think and commit (for now) and click, and the spread in the votes demonstrates there’s no one correct answer. The discussion following the vote is rich.

So many possibilities

Here’s as many of my students rationales as I can remember. I’ll use pretend instructors Michael (Mike) Jones and Elizabeth (Beth) Smith as examples.

  • My students are graduate students and postdocs, recall. Almost all of them were uncomfortable with Professor. We all know that “professor” is a title you earn at university through tenure-track and tenure positions. “Professor” means a lot and no one wants to misrepresent their status and level of achievement. I totally agree. But students are likely to call you Professor because that’s who teaches at university, right? When a student raises his hand and asks, “Professor Smith, could you explain how you got that again?” he’s not expecting this

    Oh, sure. But first, let me say I’m not actually a “professor” because I’m still working on my thesis. Once I defend and find an tenure-track position — fingers crossed, have you seen how competitive the market is — then I’ll use professor. But back to your question…

    This is why you should decide now what you want your students to call you, and let them know.

  • Same goes for “Dr. Jones,” say the graduate students in  my class. That’s a title that’s earned through hard work that they have not yet completed. No one wants to falsify their credentials.
  • Many of female graduate students feel they’re stuck with “Elizabeth” (or “Beth” if only your grandmother calls you “Elizabeth”) because they’re uncomfortable with “Miss Smith.” They often feel they must work extra hard to establish their credentials and gain the respect of their students, and “Miss” seems like it works against that.
  • I recently heard of 2 situations where the women in my class are okay with “Miss”:
    • One woman says she’s been teaching in high school and there, she uses “Miss Beth” with her students.
    • Another woman in my class, a person-of-color, says in her community, “Miss Beth” is a sign of respect and an accepted way for a student to address a teacher.
  • Many deliberate chose to use their casual, first names like Mike or Beth because they want to create a more collegial feel in the classroom, trying to remove the barrier between students and instructor.
  • When I was teaching, I also told them what I didn’t want to be called because Vancouver already had a Dr. Peter and he deserves every morsel of recognition and respect he earned through his outreach.
  • I think everyone in my classes saw, like so many other aspects of working in higher eduction, it’s easier for the male instructors to make this decision.

And that’s really the point of this whole exercise in my class – to make a decision. Now. When you’ve got time and you’re thinking straight.

Do you teach? What do your students call you? Why did you pick that name?

Navigation