Click it up a notch with i>clicker2

As some of may have heard, i>clicker is coming out with new hardware. UBC Classroom Services is already installing the new i>clicker2 receiver in many classrooms. I’ve been working with them to design a holder that mounts the receiver on the desktop so the receiver is 1) secure 2) visible.
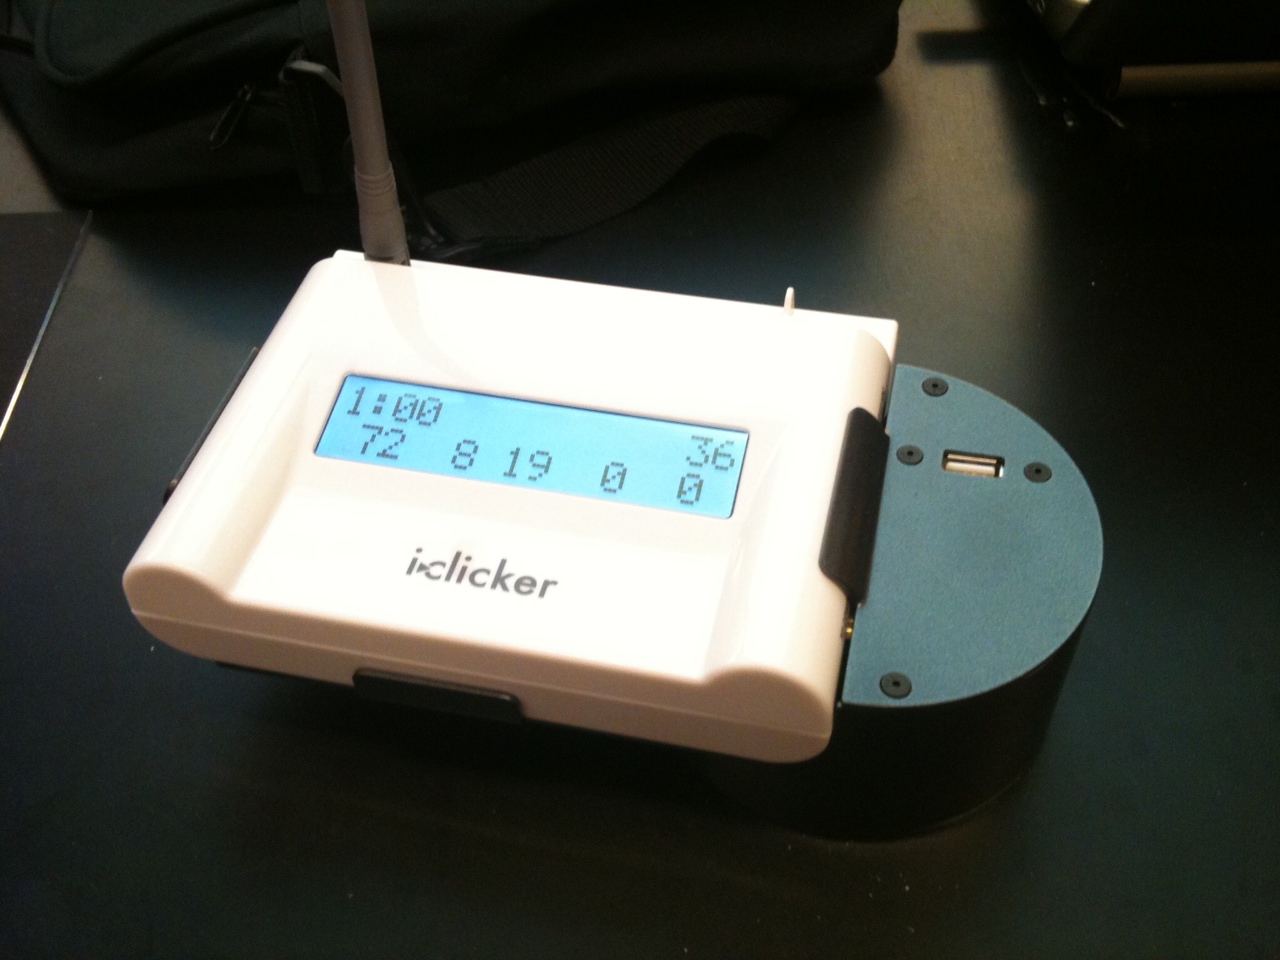
iclicker2 receiver and UBC-designed mount
New i>clicker2 receiver mounted on classroom desktop with a base designed at UBC. The base swivels 359 degrees so the instructor can see the distribution from either side of the podium. That's a USB port on the base, where you plug in the chip with the i>clicker software and your class data. (Photo: Peter Newbury)
The i>clicker2 has more options, allowing for alpha-numeric responses in addition to the usual A thru E choices. (Image from iclicker.com)

This new receiver is fully compatible with the current i>clicker clickers, the simple, white A-E clickers we know and love.

No surprise, along with the new receiver comes a new i>clicker2 clicker.

Hold it, hold it! Don’t have a fit! Yes, there are more buttons and that seems to explicitly contradict i>clicker’s advertised simplicity. The first time I saw it, yes, I, er, had a fit.

However, I’ve since had a long chat with my colleague Roger Freedman (follow him on Twitter @RogerFreedman ) at UCSB. He’s a great educator, textbook author, avid clicker user, and i>clicker2 guinea pig. In his opinion, which I sincerely trust, i>clicker2 opens up new and powerful avenues for peer instruction. His favourite is ranking tasks which can be implemented without those awkward clicker questions with choices like A) 1>2=3>4 B) 1=2>3=4 …

Here’s the thing(s):

  • instructors could use the i>clicker2 to revert back to ineffective peer instruction questions
  • i>clicker2 opens up new options for peer instruction
  • they’re coming (though UBC has not declared when)

Conclusion Let’s be pro-active and prepared to train instructors when the i>clicker2 arrives.

The first step (after finishing your fit) is figuring out what the new clicker can do. And that’s the reason for this post. In 30 minutes – er, make that 11 minutes – I’ll be heading to a demo. The rest of this post will be written shortly…

(Image CC Pedro Moura Pinheiro on flickr)

It’s 3 hours later. I’m E X C I T E D! The demo with Roberto and Shannon was, well, they had a wide spectrum of audience members, from never held a clicker before to experienced users. I had a great chat with them afterwards, though. Details below, but first, some nice features of the i>clicker2 unit:

Click to enlarge. (Images: Peter Newbury)
  • (left) When you turn on the i>clicker2, it flashes the ID number. No more problems with the sticker getting rubbed off (though Roberto assures us they have better stickers now.)
  • (center) There are only 2 batteries (but still 200 hrs of use). See those 2 little sticky-outty things at the top? They’re rubber feet to stop the clicker from sliding off the desk. Nice touch.
  • (right) There’s a metal post for a lanyard. Good idea.

I won’t go into all the details about the features of the software. There are lots.   You can take the tour at iclicker.com.

The hard part

Those of us who have been using i>clickers for peer instruction have gotten pretty ingenious about asking good, discussion-promoting questions even though we’re limited to choices A–E. It’s going to take some thinking and discussion to figure out how to take advantage of the expanded capabilities of the i>clicker2. Ranking tasks are a great start: students can easily enter a string of letters like BCDEA to rank items. It’s going to take some testing. Which leads to…

The great part

Roberto and Shannon are going to lend me a class set of i>clicker2’s for the term! Eighty clickers to try out in the classes I work in. Suh-weet!

I was chatting with my friend Warren (@warcode) afterwards. He said, “When you asked Roberto to show you what i>clicker2 can do that i>clicker can’t, his response was, essentially, ‘Here’s a set clickers. You tell us.’ ”

Challenge accepted! Stay tuned!


Peer instruction workshop: the post-mortem

About a week ago, my colleague Cyn Heiner (@cynheiner) and I ran an all-morning-and-into-the-afternoon workshop on effective peer instruction using clickers. I wrote about preparing for the workshop so it’s only fitting that I write this post-mortem.

If “post-mortem” sounds ominous or negative, well, the workshop was okay but we need to make some significant changes. For all intents and purposes, the workshop we delivered is, indeed, dead.

This was our (in hindsight, ambitious) schedule of events:

Schedule for our workshop, "Effective peer instruction using clickers."

The first part, demonstrating the “choreography” of running an effective peer instruction episode, went pretty well. The participants pretend to be students, I model the choreography for 3 questsions while Cyn does colour commentary (“Did you notice? Did Peter read the question aloud? No? What did he do instead.”) The plan was, after the model instruction, we’d go back and run through the steps I took, justifying each one. It turned out, though, that the workshop participants were more than capable of wearing both the student hat and the instructor hat, asking good questions about what I was doing (not about the astronomy and physics in the questions). By the time we got to the end of the 3rd question, they’d asked all the right questions and we’d given all the justification.

We weren’t agile enough, I’m afraid, to then skip the next 15 minutes of ppt slides when we run through all the things I’d done and why.

Revised workshop: address justification for steps as they come up, then very briefly list the steps at the end, expanding only on the things no one asked about.

In the second part of the workshop, we divided the participants into groups of 2-3 by discipline — physics, chemistry, earth and ocean sciences — and gave them a topic about which they should make a question.

Topics for peer instruction questions. (Click to enlarge.)

We  wrote the topics on popsicle sticks and handed them out. This worked really well because there was no time wasted deciding on the concept the group should address.

We’d planned to get all those questions into my laptop by snapping webcam pix of the pages they’d written, and then have each group run an episode of peer instruction using their own question while we gave them feedback on their choreography. That’s where things went to hell in a handcart. Fast. First, the webcam resolution wasn’t good enough so we ended up scanning, importing smart phone pix, frantically adjusting contrast and brightness. Bleh. Then, the questions probed the concepts so well, the participants were not able to answer the questions. Almost every clicker vote distribution was flat.

One group created this question about circuits. A good enough question, probably, but we couldn't answer it in the workshop.
These are the votes for choices A-E in the circuits question. People just guessed. They are not prepared to pair-and-share so the presenter did not have the opportunity to practice doing that with the "students."

The presenters had no opportunity to react to 1 overwhelming vote or a split between 2 votes or any other distribution where they can practice their agility. D’oh! Oh, and they never got feedback on the quality of their questions — were the questions actually that good? We didn’t have an opportunity to discuss them.

We were asking the participants to create questions, present questions, answer their colleagues’ questions AND assess their colleagues’ peer instruction choreography. And it didn’t work. Well, d’uh, what were we thinking? Ahh, 20/20 hindsight.

With lots of fantastic feedback from the workshop participants, and a couple of hours of caffeine-and-scone-fueled brainstorming, Cyn and I have a new plan.

Revised workshop: Participants, still in groups of 2-3, study, prepare and then present a clicker question we created ahead of time.

We’ll create general-enough-knowledge questions that the audience can fully or partially answer, giving us a variety of vote distributions. Maybe we’ll even throw in some crappy questions, like one that way too easy, one with an ambiguous stem so it’s unclear what’s being asked, one with all incorrect choices… We’d take advantage of how well we all learn through contrasting cases.

To give the participants feedback on their choreography, we’ll ask part of the audience to not answer the question but to watch the choreography instead. We’re thinking a simple checklist will help the audience remember the episode when the time comes to critique the presentation. And that list will reinforce to everyone what steps they should try to go through when running an effective peer instruction episode.

The participants unanimously agreed they enjoyed the opportunity to sit with their colleagues and create peer instruction questions. Too bad there wasn’t much feedback, though. Which leads to one of the biggest changes in our peer instruction workshop

2nd peer instruction workshop: Creating questions

We can run another workshop, immediately after the (New) Effective peer instruction or stand-alone, about writing questions. We’re still working out the details of that one. My first question to Cyn was, “Are we qualified to lead that workshop? Shouldn’t we get someone from the Faculty of Education to do it?” We decided we are the ones to run it, though:

  • Our workshop will be about creating questions for physics. Or astronomy. Or chemistry. Or whatever science discipline the audience is from. We’ll try to limit it to one, maybe two, so that everyone is familiar enough with the concepts that they can concentrate on the features of the question.
  • We’ve heard from faculty that they’ll listen to one of their own. And they’ll listen to a visitor from another university who’s in the same discipline. That is, our physicists will listen to a physicist from the University of Somewhere Else talking about physics education. But our instructors won’t listen to someone from another faculty who parachutes in as an “expert.” I can sort of sympathize. It’s about the credibility of the speaker.

Not all bad news…

Cyn and I are pretty excited about the new workshop(s). Our bosses have already suggested we should run them in December, targeting the instructors who will start teaching in January. And I got some nice, personal feedback from one of the participants who said he could tell how “passionate I am about this stuff.”

And, most importantly, there’s a physics and astronomy teaching assistants training workshop going on down the hall. It’s for TA’s by TA’s and many of the “by TA’s” were at our workshop. Now they’re training their peers. These people are the future of science education. I’m proud to be a part of that.


Phases of the Moon

Understanding the phases of the Moon is one of just a handful of concepts that you’ll find in every introductory, general-education “Astro 101” course. “Understanding”, of course, is a terrible description of learning. We have a much more specific learning goal:

After this activity, you [the student] will be able to

  • use the geometry of the Sun, Earth and Moon to illustrate the phases of the Moon and to predict the Moon’s rise and set times
  • illustrate the geometry of the Sun, Earth and Moon during lunar and solar eclipses, and explain why there are not eclipses every month

Everyone who teaches moon phases, from K-16, has their own favourite approach and apparatus. We get 30-40 students for a 50-minute period in our lab, a time meant targeting concepts are better learned in a hands-on environment. Our activity is built around an remarkable, 10-second experience: Students hold a styrofoam ball at arm’s length in a darkened room with one, bright, central light source. They do a pirouette, watching the pattern of light and shadow on the “Moon”.  Ooohs. Aaaahs. Lightbulbs going off. Truly a golden moment.

This page contains materials for what we do for the other 49 minutes and 50 seconds of the lab.

Equipment

Each group of 3 students gets 2 styrofoam balls, one Earth and one Moon. As the picture shows, we divide the Moon in half and write “NEAR” and “FAR” on the hemispheres. On the Earth ball, we draw the Equator, meridians at 0, 90, 180, 270 degrees longitude (which are 6 hours of daily rotation apart) and dashed meridians on the 45’s (3 hours of rotation apart.) A small sticker represents the observer and the cardinal points help students remember which way to spin the Earth to mimic the daily rotation.

At the center of the lab sits “the Sun”. This is a really bright lightbulb (150 W or more) on an equipment stand. To prevent light from scattering off the floor and ceiling, we built aluminum foil “baffles” that sit above and below the light. They allow only thin disk of light to shine into the room.  The light bulb is set to the students’ shoulder-level so when they hold the Moon at arm’s length, the styrofoam ball naturally goes into the light.

Materials

Instructor’s Guide

After running this activity for several terms, we realized there is a lot for the teaching assistants to do and say to keep the activity running. Those instructions eventually found their way into this instructor’s guide.

Credit

Unless credit is given explicitly, all documents, graphics and images are licensed under a Creative Commons License Creative Commons Attribution-NonCommercial-ShareAlike 3.0 Unported License.  This work is supported by the Carl Wieman Science Education Initiative.

Your feedback, comments, suggestions

If you use the materials here and find a alternate approach, tweak or extension, please share it by leaving a comment.  Thanks!

Navigation